In this section, we’ll walk you through the steps to access the Cisco DNA Center’s CIMC (Cisco Integrated Management Controller). The CIMC provides essential remote management capabilities for your DNA Center appliance.
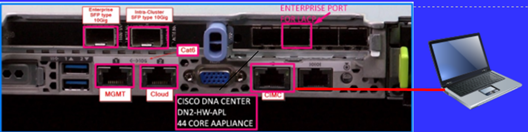
Step 1: Physical Connection
Begin by accessing the CIMC using one of the following methods:
- KVM Cable: Attach a KVM (Keyboard, Video, Mouse) cable to the KVM connector on the front panel of the appliance.
- Keyboard and Monitor: Alternatively, you can connect a keyboard and monitor to the USB and VGA ports on the rear panel of the appliance.
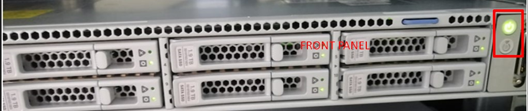
Step 2: Power Up
Ensure that the power cord of the DNA Center appliance is properly plugged in and that the power is turned on.
Press the Power button located on the front panel of the appliance to initiate the booting process.
Step 4: Cisco IMC Configuration
Upon booting, you should see the Cisco IMC configuration utility boot screen displayed.
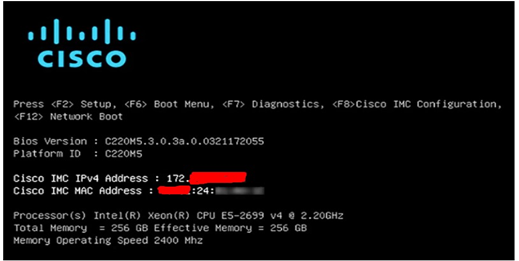
Step 5: Access Configuration
Press the F8 key on your keyboard to access the Cisco IMC configuration. The configuration screen will appear.
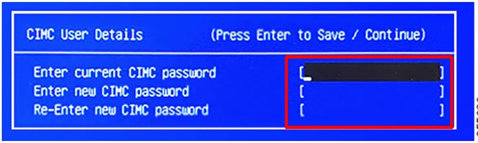
Step 6: Set Password
In the “Enter current CIMC Password” field, enter the default CIMC user password as password. You will also need to set a new password of your choice.
Step 7: Network Configuration
Enter the CIMC IP address, subnet mask, gateway, and DNS settings as required. Press F1 to access additional settings if needed.
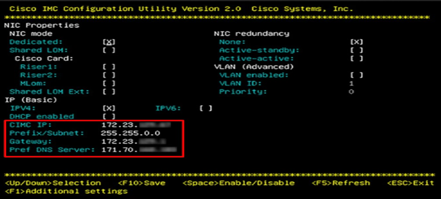
Step 8: Save Configuration
To save the configuration settings, press F10. Press Escape to exit and reboot the appliance.
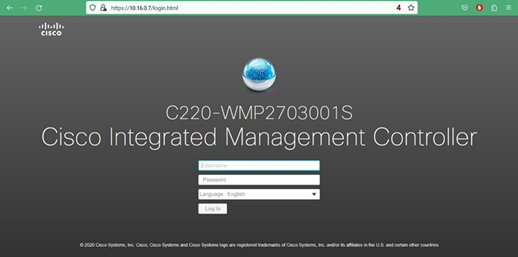
Step 9: Access CIMC GUI
Once the appliance has completed rebooting, open a web browser on a client machine connected to the same subnet as the appliance.
Enter the following URL in the browser’s address bar: https://CIMC_ip_address, where CIMC_ip_address represents the Cisco IMC port’s IP address that you configured in Step 7.
Your web browser will display the main Cisco IMC GUI login window. For more information visit cisco official document https://cisco.com
Following these steps will grant you access to the Cisco DNA Center’s CIMC, allowing for remote management and monitoring of your DNA Center appliance. For
In our next guide, we will delve into the initial configuration of your Cisco DNA Center. Stay tuned for Part 4 of our Cisco DNA Center deployment series! For part 1 & 2 please click here https://skillset-bd.com/category/sdn/sd-access/