Deployment of Cisco SD-WAN on-prem, we need mutual authentication using certificate. So we need to generate and install root certificate on all devices which will be join to the SD-WAN fabric network. On this blog, I want to configure vManage as Root CA. We consider all controllers are configured and added to vManage. First generate Root Certificate Authority (ROOT CA), then signed vManage CSR with the root CA and the last but not least install the signed certificate on vManage. On the lab, We use OpenSSL tools for generate and sign certificate which installed on vManage using vshell.
First, we need to create a root CA and the first step is to generate a private key. Let’s open vshell:
vManage# vshell
vManage:~$
We can check present directory using pwd command
vManage:~$ pwd
/home/admin
vManage:~$
Now we will run bellow command to generate private key, I named ROOTCA.key you can give any name.
vManage:~$ openssl genrsa -out ROOTCA.key 2048
Generating RSA private key, 2048 bit long modulus (2 primes)
....................
e is 65537 (0x010001)
We will create a root CA certificate using the private key we just created:
openssl req -x509 -new -nodes -key ROOTCA.key -sha256 -days 2000 -subj "/C=ID/ST=Dhaka/L=Dhaka/O=sdwan-lab sdwan/OU=sdwan-lab sdwan/CN=skillset-bd.com" -out ROOTCA.pem

vManage:~$ ls
ROOTCA.key  ROOTCA.pem  archive_id_rsa.pub
Now it’s time to open the vManage GUI. This is where we need to install the root certificate. Open a web browser and enter the URL https://vmange-ip:8443/. You’ll see the following main screen:
Go to Administration > Settings > Controller Certificate Authorization
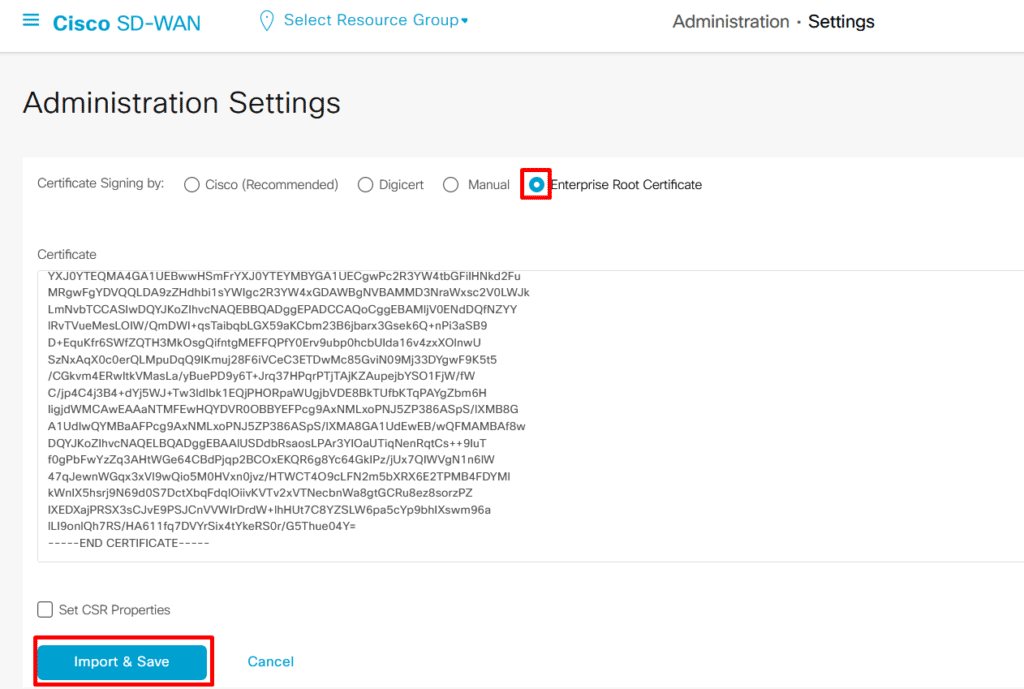
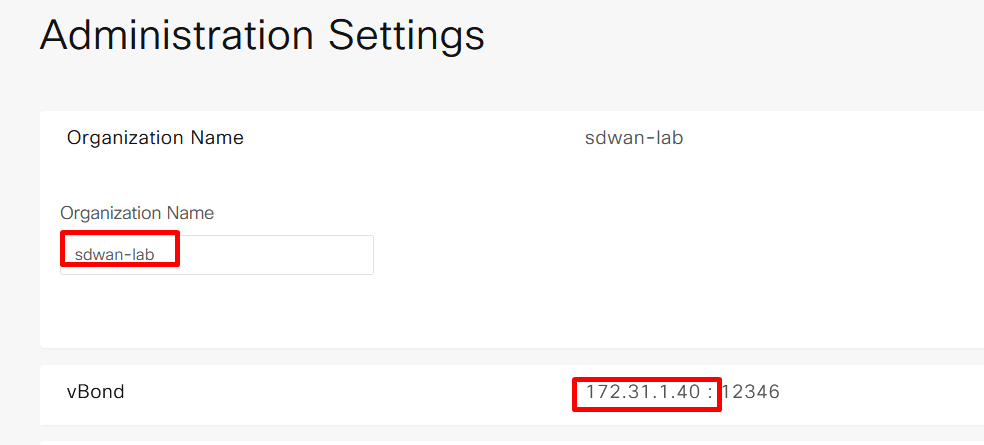
We need to change two settings before generating CSR, one is organization name and second is vbond address. organization name will be used to generate CSR and this name will be used by controllers for mutual authentication.
vManage Certificate: Now it’s time to install singed certificate to vManage. First need to create CSR.
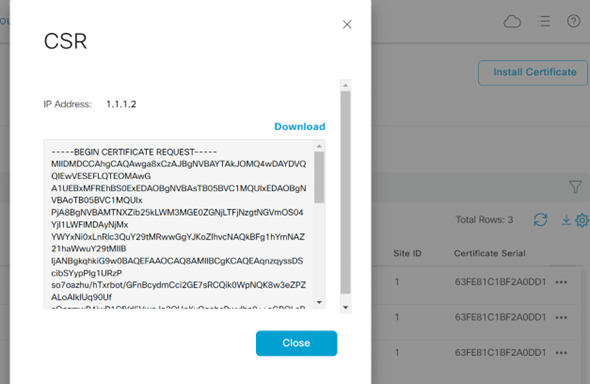
Configuration > Certificates > Controllers > vManage > Generate CSR:

You don’t have to download or copy and paste as it’s saved locally automatically. We’ll open vshell on our vManage controller and see csr file.
vManage:~$ ls
ROOTCA.key  ROOTCA.pem  archive_id_rsa.pub  vmanage_csr
The CSR is saved automatically in /home/admin as vmanage_csr.
Let’s sign a vmanage_csr. We can use the following openssl command:
openssl x509 -req -in vmanage_csr -CA ROOTCA.pem -CAkey ROOTCA.key -CAcreateserial -out vmanage.crt -days 2000 -sha256

vManage:~$ ls
ROOTCA.key  ROOTCA.srl            vmanage.crt
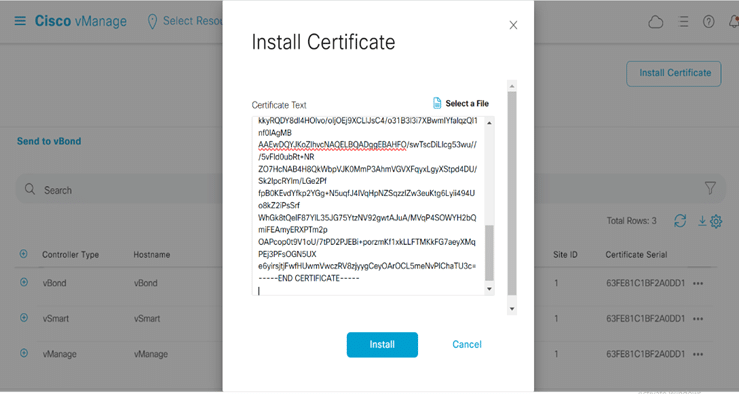
Now we can copy certificate vmanage.crt and Go back to the vManage GUI and click on Install Certificate. Paste the contents of the vmanage1.crt file here: Configuration > Certificates > Controllers > Install Certificate > Paste the contents of the vmanage.crt:
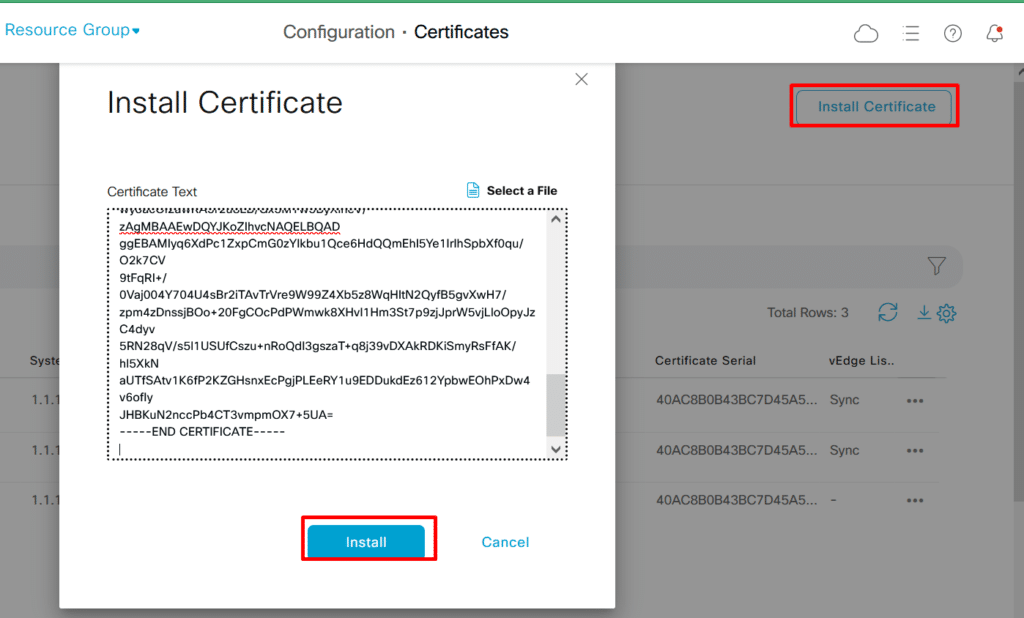
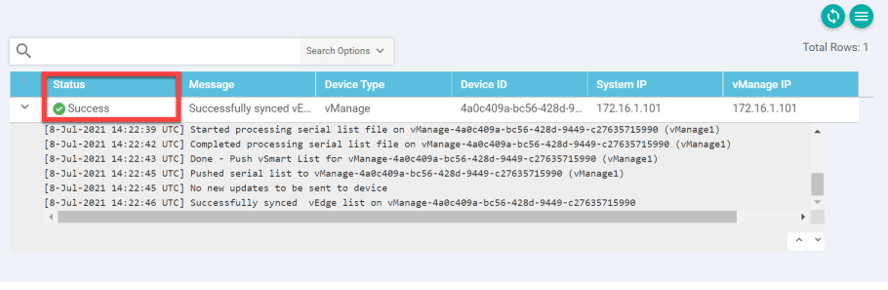
Click on Install. It might take a few seconds to install the certificate but once it does, you’ll see the Success message:
Generate a CSR Certificate for vBond
Go to Vmanage configuration >certificate>Controllers>three dot(…)>Generate CSR>Copy CSR
Go to Vmanage(Root CA) CLI> vshell>Create Folder by name cat>>vbond_csr hit enter and paste generated CSR from Vmanage Gui then cntl c.
vManage:~$ cat > vbond_csr
-----BEGIN CERTIFICATE REQUEST-----
MIIDSTCCAjECAQAwgcgxCzAJBgNVBAYTAlVTMRMwEQYDVQQIEwpDYWxpZm9ybmlh
MREwDwYDVQQHEwhTYW4gSm9zZTESMBAGA1UECxMJc2R3YW4tbGFiMRYwFAYDVQQK
Ew1DaXNjbyBTeXN0ZW1zMUEwPwYDVQQDEzh2Ym9uZC0yYTQzYTI3YS1mMTY5LTQ2
NDctOGQzYS00Zjg3M2I3OWE4MjAtMC52aXB0ZWxhLmNvbTEiMCAGCSqGSIb3DQEJ
ARYTc3VwcG9ydEB2aXB0ZWxhLmNvbTCCASIwDQYJKoZIhvcNAQEBBQADggEPADCC
AQoCggEBAKrLVTebRNeguesv3e4CQo7vX+Z+hQl3BAWNZOFN5YcK3/4qZUft+9y+
dbVqOBJ6ytNwGT7BW3wK/7qffMekMmft+uOP2yCgHWpEMdbx9EHH4N6ry9bADl1K
dCixhveoWcpJDbdY4LN8n0QPUnO4AcMl1JXLMd6knaUr8gD9dnsJ+dQfOuRFI8kR
6psVRRnIamrijHviiVB0nLkHX3RyfYMgyA5brWJRpTMgx3g3QDIIKe+J+Ez6PpCx
TaxTwcqWkun8Eonc9w64YfZhc9QjMv48qwsYOXHV19g5lMLp6xtbLV0ghguq0vmt
tOPDXAHcifcjiqknIqYIG3a08H+1u3MCAwEAAaA7MDkGCSqGSIb3DQEJDjEsMCow
CQYDVR0TBAIwADAdBgNVHQ4EFgQU4JkqF0TcfBeUcr9C4gf1jFcSYe8wDQYJKoZI
hvcNAQELBQADggEBACsKQGggUKmqmM1Wiw9IVbfBBO2i2CttnHrW6SJttx8yTiBJ
WiKEcyhF7k1u92vbDRasNsb+BMx6PZ7FaXHTRNU8wlj2szZEcV6IWiKBCVra+KCF
94TzLDAuRtGLsl/XuxyrDYNr4lkZvq0bLnAlP2gNF5FCe6NG/QvRBmLS9z7ssJ+a
f8Yk1kIris4nPDZKW4/OMq18CZ9mgHOMiA5C6i++FBSqNgb4Gnez8IuJ1yGOALuf
LwDBVQ9N1uEdWswOVjTT2q3W388G4gWL7tAWagFpSsXIGrKILqiytQJK4aI40xX/
2gxnyJehJpykPDCRmMao/XUfgKXmQUGjT2JJmXg=
-----END CERTIFICATE REQUEST-----
^C
vManage:~$ ls
ROOTCA.key  ROOTCA.srl          vbond_csr    vmanage_csr
ROOTCA.pem  archive_id_rsa.pub  vmanage.crt
Install Signed Certificate to vBond
Copy signed certificate by cat vbond.crt and go to vmanage >controllers> install certificate>paste copied signed certificate >click install
We should see that the status is success, Means that we placed the certificate onto vBond.
Add vSmart Controller:
Generate a CSR Certificate for vsmart
Sign vsmart CSR by Root CA(our case vManage is Root CA): Root CA will sign vsmart_csr using his private and public key as shown below:
openssl x509 -req -in vsmart_csr -CA ROOTCA.pem -CAkey ROOTCA.key -CAcreateserial -out vsmart.crt -days 2000 -sha256
createserial -out vsmart.crt -days 2000 -sha256 ROOTCA.pem -CAkey ROOTCA.key -CAc
Signature ok
subject=C = US, ST = California, L = San Jose, OU = sdwan-lab, O = Cisco Systems, CN = vsmart-d9766451-c1bc-47ba-a570-78429f1f108b-0.viptela.com, emailAddress = [email protected]
Getting CA Private Key

vManage:~$ ls
ROOTCA.key  ROOTCA.srl          vbond.crt  vmanage.crt  vsmart.crt
ROOTCA.pem  archive_id_rsa.pub  vbond_csr  vmanage_csr  vsmart_csr
vManage:~$ cat vsmart.crt
-----BEGIN CERTIFICATE-----
MIID0DCCArgCFECsiwtDvH1FpWXtS94yIs/d/N6eMA0GCSqGSIb3DQEBCwUAMH8x
CzAJBgNVBAYTAklEMRAwDgYDVQQIDAdKYWthcnRhMRAwDgYDVQQHDAdKYWthcnRh
MRgwFgYDVQQKDA9zZHdhbi1sYWIgc2R3YW4xGDAWBgNVBAsMD3Nkd2FuLWxhYiBz
ZHdhbjEYMBYGA1UEAwwPc2tpbGxzZXQtYmQuY29tMB4XDTI0MDMxNjA3MjU1MVoX
DTI5MDkwNjA3MjU1MVowgckxCzAJBgNVBAYTAlVTMRMwEQYDVQQIEwpDYWxpZm9y
bmlhMREwDwYDVQQHEwhTYW4gSm9zZTESMBAGA1UECxMJc2R3YW4tbGFiMRYwFAYD
VQQKEw1DaXNjbyBTeXN0ZW1zMUIwQAYDVQQDEzl2c21hcnQtZDk3NjY0NTEtYzFi
Yy00N2JhLWE1NzAtNzg0MjlmMWYxMDhiLTAudmlwdGVsYS5jb20xIjAgBgkqhkiG
9w0BCQEWE3N1cHBvcnRAdmlwdGVsYS5jb20wggEiMA0GCSqGSIb3DQEBAQUAA4IB
DwAwggEKAoIBAQCJviF1oaWfVVteL+5Tk03KPghGGKNyaj6uk7H/GAjaHWsY40AJ
obyeH9r3srjGCyIw9KmiTl/YsKw+CfaKStYUoesWoK+7UBCo4LBIOLHM0mlJRTyu
SC41CJxzT3DjoKoJLlSWmRa8kCQ/D3YQvo7cdGzSC2xwp/7U0s/oSTxX3c2fECE+
+xk5dQ6PY8tXlng9w2+yKqvA49F0RTDOp6szFeM60TGrlQnyMJ5Rs62Wy1sIwuHf
lGeI58CSj4lXETlTRe3uLkJHcKfKePfJCnGWsvJa3uRTIxJItjfgOr8yx7W/6aPx
wyoacOi2awRA5r2u8LB/Gx5MTw5ByXIheV/zAgMBAAEwDQYJKoZIhvcNAQELBQAD
ggEBAMIyq6XdPc1ZxpCmG0zYIkbu1Qce6HdQQmEhI5Ye1IrIhSpbXf0qu/O2k7CV
9tFqRI+/0Vaj004Y704U4sBr2iTAvTrVre9W99Z4Xb5z8WqHItN2QyfB5gvXwH7/
zpm4zDnssjBOo+20FgCOcPdPWmwk8XHvI1Hm3St7p9zjJprW5vjLloOpyJzC4dyv
5RN28qV/s5l1USUfCszu+nRoQdI3gszaT+q8j39vDXAkRDKiSmyRsFfAK/hl5XkN
aUTfSAtv1K6fP2KZGHsnxEcPgjPLEeRY1u9EDDukdEz612YpbwEOhPxDw4v6ofIy
JHBKuN2nccPb4CT3vmpmOX7+5UA=
-----END CERTIFICATE-----
Install Signed Certificate to vSmart:
Copy signed certificate by cat vsmart.crt and go to vmanage >controllers> install certificate>paste copied signed certificate >click install

We should see that the status is success, Means that we placed the certificate onto vSmart.
Is it mandatory to copy the vmanage.pem file to all other controllers? because I didn’t see that step in your docs. we just signed the CSR and generated CERT but didnt copied the root pem file to vsmart and vbond
Yes, it is mandatory to copy the vmanage.pem file (root CA certificate) to all other controllers (vSmart and vBond). This step ensures that all controllers trust the root certificate authority. Without it, the controllers won’t establish secure communication.